I am often asked what to do about wounds when you are in remote places. Making a good suture with stitches is quite difficult and also risky: just think of what can happen if, not knowing where nerves and blood vessels run, you end up stitching the latter.
That is why I believe that anyone who risks finding themselves in these situations should know how to apply an adhesive suture. These sutures have the merit of being easy to apply, light and cheap.
They can also be applied temporarily in the case of deep wounds with clean edges that are not touching each other.
Only if you are sure you have removed all debris and foreign bodies (which would lead to infection) can you apply adhesive sutures.
In emergencies these sutures can also be made by cutting the edges of a non-elastic plaster.
In any case the area, if it is bleeding, must always be packed, and you must never forget the good rules of keeping the part raised and, if possible, cold, as well as rinsing it thoroughly.
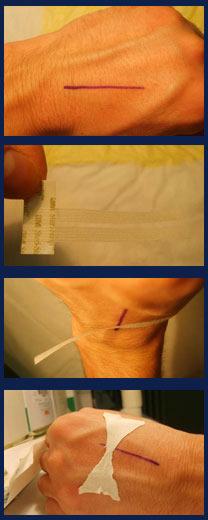
Application is simple: the strips must be placed perpendicular to the wound, stuck down first on one side only, pulled gently until the edges of the wound come together, and finally stuck down.
How to apply an adhesive suture
- clean the wound well by rinsing it with water and disinfectant; do not use cotton wool
- stick down one side;
- gently pull the skin to bring the edges of the wound together;
- stick down the other side;
- cover with a plaster.
Emergency adhesive suture
Cut an hourglass shape out of a plaster like the tape commonly used by climbers for taping their fingers. The key idea is to have a large adhesion surface on the skin and little plaster in contact with the wound. Apply it like a ready-made adhesive suture. (see above)
The last frame shows an example of an emergency adhesive suture made from finger tape.
Article by Dr Kelios Bonetti, surgeon and expert in climbing-related pathology.
More on the website: www.patologia-arrampicatoria.it
Adhesive sutures should never be missing from the first aid kit you take on a hike.